Showing posts with label Gluten-Free Baking. Show all posts

Tuesday, May 30, 2017

Diving into Mrs. Beeton for a Questionable Chocolate Bundt Cake Recipe

I recently mentioned wanting to get a bundt pan to my husband. I don't remember why exactly, but it seemed like something I needed to do, especially after making the most epicly delicious Sweet Potato Cake from an old IKEA cookbook that I bought ages ago and never used until recently. It's actually less a cookbook and more of a guide to great kitchen living, with tips on using scraps and how to sort your produce. It's more of a coffee table book chock full of delicious, Nordic recipes. The Sweet Potato Cake recipe was a huge hit with my munchkins, even with my gluten-free substitute flour. 

But back to the bundt pan.

When I mentioned it, my husband said, "Oh, I have a great recipe!" He led me into the kitchen to his ancient copy of Mrs. Beeton's Book of Household Management, a mainstay of the British world, and pulled out a barely legible chocolate bundt cake recipe written on a scrap of paper. 


We’re going out for Shabbat lunch, and I'd offered to make dessert, so make the cake I did. But not before calling and/or messaging him a half-dozen times to verify aspects of the recipe. 

"How much is in a 'packet of baking powder' exactly? We don't have packets of baking powder in America." 
“5 teaspoons of baking powder, seriously? But only 1.25 cups flour? Really?”

"The recipe says milk, but there's no milk listed in the ingredients!"  
"Really, only 1.25 cups flour, really?" 
I'll admit I fudged a bit and doubled the amount of cocoa powder it called for because it just didn't look chocolatey enough. After I got it into the bundt pan and into the oven, I made another half-batch of the batter because I didn't believe it was going to work. I put the half batch in some mini bundt pans I'd gotten and into the oven it all went. 

When I pulled them out, I was skeptical. I took a taste. It's not half bad, for being a questionable scrap-o-paper recipe made with gluten-free flour. It's not as sweet as American cakes, but honestly that's probably a good thing. 

"Let me make it," my husband says. "With real flour."

[Above written before Shabbat. Below written after.]

Luckily, the Shabbat guests loved the cake. It was different, but super tasty. We also checked in with his mum after Shabbat and found out that her packet of baking powder actually contains only 3 teaspoons of baking powder, so that might make a difference. 

Also, over Shabbat, there was discussion about the name of the pan used to make the bundt cake, and Mr. T swore up and down that there was a different name the this mom used for the pan. After Shabbat, he asked, and lo and behold, he wasn't making it all up:


So here's the recipe transcribed, in case you want to make it yourself in a gugelhupf or bundt pan:

"Choc Cake"

Ingredients
1 1/4 cup flour
2 Tbls cocoa powder (original recipe called for 2 tsp, but we asked; it's Tbls)
1 cup sugar
1/2 cup water
1/2 cup oil
2 eggs (possibly 3, we still aren't sure)
1 packet baking powder (in UK, and the note says, "if not self raising" ... this = 3 tsp baking powder)

Directions
  1. Preheat the oven to 180 degrees C.
  2. Grease tin.
  3. Mix flour, sugar.
  4. Add mix, oil, and eggs.
  5. Bake for 35 min approx.
Notes: 
  • It turns out self-rising flour is preferred in the UK, but whatever you have should work.
  • I used Cup4Cup Wholesome Flour for this recipe. 

IKEA Sweet Potato Muffin Recipe


Once up on a time, I loved eating at the IKEA cafe. When I went kosher, this was no longer a possibility, until I lived in Israel, where, you guessed it, the cafe is kosher! I miss those inexpensive meals of salmon, green beans, and french fries ... ah, those were the days.

Now, my only peace of mind comes from being able to use the IKEA Cookbook to craft some delicious nosh that, honestly, you'd never find in their cafes anyway.

But, to be honest, this isn't necessarily a cookbook. It's more of a "how to have an amazing kitchen and respect the planet, yourself, and your kitchen" book. The tips in this tome are impressive, thoughtful, and universal.


The bummer is that it seems this book -- Our Food, Naturally -- is no longer available, and for that, I apologize to you, because you're missing out. The photography just jumps off the page at you, too.


And now? On to the recipe simply called ...

"Muffins"

Ingredients
7 oz roasted yams
1 cup soft butter (room temperature)
1/3 cup strained yogurt 10%
1 1/4 cup plain flour
2 tsp baking powder
3 oz coarsely grated apple with peel
1/2 cup white sugar
3 eggs, whisked
melted butter for the cups

Directions
Put the yam flesh, butter, and yogurt into a food processor and blend. Put the mixture in a bowl and sieve in the flour and baking powder. Mix together and whisk the grated apple, sugar, and eggs into the dough. Divide the muffin mixture into cups (roughly 1/2 cup) greased with a little melted butter. Fill with mixture to 1/2 inch from the edge. Bake at 350 degrees F for 25-30 minutes or until they feel firm and are golden on top.

Notes:
  • I ended up roasting two medium-sized sweet potatoes, which was actually enough to double the recipe. So one medium sweet potato should do the trick. 
  • I used Greek yogurt in this recipe. 
  • For the flour, I used Cup4Cup as a gluten-free replacement. 
  • I very rarely mix ingredients separately, because I'm a lazy cook. I just there everything into the KitchenAid mixer and let the whisk attachment do the rest. 

Monday, January 2, 2017

Happy New Year!


Ah, another year has come and gone, and here we meet again. I started this blog almost 11 years ago, and for the past few years, things have been quiet and slow. I'm expecting some interesting changes in the near future, which hopefully will allow me a bit more time to devote to this beloved blog (beloved by me), because it has always been a happy place for me. 


I started the year out right by making a wholesome breakfast for the family, then I made some gluten-free banana nut muffins, did the dishes, started some laundry, and then I was basically exhausted. Whew! Here's to tiny children getting older and me getting some energy back? That's a thing, right? 

What are you hoping for in 2017?

Friday, October 28, 2016

The Holy Grail: Braidable Gluten-Free Challah (Motzi)


I've been working on this recipe for a while, and although it's not perfect and I'm going to keep working on it (so check back for edits) to perfect it completely.

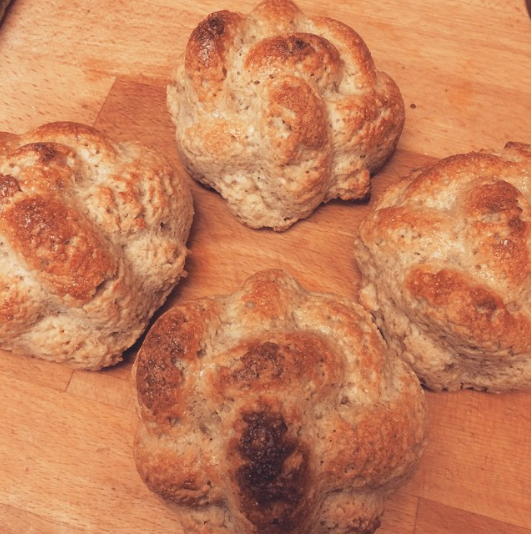
This recipe simplifies on my Best-Ever Gluten-Free Challah recipe, and it also creates a dough that is ... wait for it ... braidable! Yes! Now, it's not going to be braidable like a traditional gluten-based dough, but it fits the bill and makes for some beautifully braided gluten-free challah at last.

Like I said, this recipe isn't perfect, but it works. You end up with a very delicate dough, so make sure you have some spare flour on hand for braiding. This makes roughly five very good-sized small loaves for me. More pictures are also forthcoming (10/28), I just had someone ask me for this recipe and I've delayed long enough so I needed to get it up.


Ingredients

1 package yeast
1 1/4 cup warm water
1/4 cup sugar
1/2 Tbls salt
1/3 cup oil + 1 Tbls
2 eggs
2.5 cups gluten-free oat flour
2 cups Cup4Cup Wholesome Flour 

Directions

  1. Mix yeast with warm water and let it froth. The yeast must activate for this challah to work!
  2. In a stand mixer (I use my KitchenAid), mix the dry ingredients together (flour, salt, sugar) with the dough hook. 
  3. Add in the wet ingredients (eggs and oil).
  4. Mix in the yeast/water mixture. 
  5. Continuing mixing for a few minutes until the dough is stiff and falls easily off of the hook. If it looks too wet, add up to 1/4 cup more of the Cup4Cup. 
  6. Let rise in a warm place for 1 hour or overnight.
  7. After rising, separate the dough and create 4-5 small braided loaves. You can also roll the dough in balls and place in small loaf pans to create "pull apart" loaves or use a standard challah pan.
  8. Let rise in a warm place for 1 hour. 
  9. Bake at 375 degrees Fahrenheit for ~30 minutes. The timing will vary on the size of your loaves, so keep a good eye on them after 30 minutes. 

Note: The Wholesome Flour is parve/non-dairy, while the Multipurpose Cup4Cup is dairy (for whatever reason). The dairy Cup4Cup actually makes for a more easily braidable and gorgeous, yet denser, gluten-free challah, but I know many looking for a recipe will want a parve/non-dairy version. 

Note Two: The pictures in this post are from using the Multipurpose Cup4Cup.

Tuesday, September 27, 2016

Tis the Season: The Best-Ever Gluten-Free Honey Cake Recipe!

I love this time of year. The seasons are changing, the weather is cooling, and layers, ankle boots, and scarves are starting to pop up here, there, and everywhere. It also means it's time for the Jewish High Holidays of Rosh HaSHanah and Yom Kippur!

The latter is filled with fasting and deep reflection and prayer, while the former features joyous celebrations complete with a classic: apples and honey.

Asher wanted to shoot some photos of the delicious honey. Great shot, kiddo!

Luckily, I received a boatload of L.R. Rice Raw & Unfiltered Honey and Rice Family Raw & Unfiltered Honey for review, which means it's time for honey cake!

Now, one of my greatest gripes around any of the Jewish holidays (except maybe Passover, because gluten disappears from everyone's tables for the most part) is that I can't enjoy any of the awesome baked goods out there. Lucky me, I recently discovered Cup4Cup Flour, which, honestly folks, really does work like the real thing. I've made muffins, we've made beer-battered fish (which my British husband wholly approves of), and even challah. Yes, I'm trying to perfect a simpler gluten-free challah recipe using Cup4Cup, too. 

In the meantime, I've made this amazingly delicious, non-dairy, gluten-free honey cake for your enjoyment! Are you ready?

Chaviva's Best-Ever Gluten-Free Honey Cake

Ingredients
3 eggs
3/4 cup sugar
1 cup strong black coffee (I used tea)
2 tsp baking powder
3 Tbls Earth Balance Vegan Buttery Sticks (or margarine), softened
1 tsp baking soda
1 tsp cinnamon

Directions
  1. Preheat the oven to 325 degrees F. Grease two 8x8 baking pans or one 9x13-inch cake pan.
  2. In your Kitchenmaid or other mixer, beat the eggs and honey together. 
  3. Add sugar and mix again. 
  4. Mix baking powder with the coffee and "butter," and then add it to the egg mixture.
  5. Add baking soda, flour, and cinnamon. 
  6. Beat until well combined. 
  7. Pour into the prepared pan(s) and bake for 55 minutes or until a toothpick comes out clean. 
Enjoy! Let me know if you make this and what you think. It's rich, sweet, dense, and the ultimate snack. You know what, I'm going to make another cake now ... 

SaveSave

Tuesday, July 12, 2016

My Fat Dad: Book and Nosh Review + Giveaway

[Giveaway at the end of the post!]

I grew up in a house where the Diabetic Diet reigned supreme. I remember measuring cups of green beans hitting the plate off and on my entire childhood, peppered with frequent visits to Red Lobster (mom's favorite for holidays and birthdays), Benitos (a Mexican restaurant) for piled-high plates of beans and cheese, and McDonalds and Sonic for burgers, fries, and drinks with my father's beloved crushed ice. Everyone in my immediate family has battled with weight and diet pretty much our entire lives, and (except for me who has been privileged to always be on the more voluptuous side) has swung between thinness in their younger days to larger waistbands in their 20s and beyond.

My mom and dad never went to the dieting extremes that Dawn Lerman's father did in My Fat Dad: A Memoir of Food, Love, and Family, with Recipes, but I can relate to growing up in an environment where food obsession was manifest in countless ways — both constructive and destructive.

When I was contacted about reviewing My Fat Dad, I jumped at the chance because from a quick look it seemed like something that would really resonate. Although it became clear that Lerman and I didn't grow up with the same relationship with food, I have to say it was a really fascinating and entertaining read. For the first few chapters I was confused, as Lerman focused largely on her tenuous and tentative relationship with her mom, but as the book went on I understood why she wrote the book the way she did.

Both of her parents are Jewish, and both grew up in a post-Holocaust world with parents uniquely obsessed with classic Jewish food. However, whereas her actress mom grew up with an "eat to live" mindset, her advertising guru of a father grew up with a "live to eat" mindset. The author, Lerman, subsequently found herself obsessed with food — cooking it, baking it, understanding how it fits into specific diets, how it could save her dad, how it could comfort her sister, and more.

Unlike me, however, Lerman managed to end up with a pretty healthy relationship with food, thanks to her grandmother "Beauty," who taught her how to make just about anything and everything. Lerman ended up seeing the world through food. I didn't learn how to make anything growing up, so my relationship with food has always been tense, with binges (and starvation periods when I was a teen) and purges of the things that I love. It wasn't until I was in my mid-20s that I started to really explore and understand food in the way that Lerman did her whole life. I learned that steak didn't have to be overcooked, vegetables didn't always come out of a can, and the microwave wasn't necessarily my best friend. (Honestly, I think becoming kosher saved me and my health, because fast food was my BFF most of my life.)

Food, for Lerman, was a source of nurturing and healing when it came to her relationship with her parents and sister and grandparents, and that's something I so admire. I honestly think that the more a child grows up understanding and experimenting with food, the more healthy their overall relationship with food and the more there is a balance between "live to eat" and "eat to live," and I think Lerman's a really powerful example of that reality.

My Fat Dad really takes you on a food journey, both her obese father's journey and battle with food in the fast-paced world of advertising and her own journey to understand and explore all of the food options the world has to offer.

The most unique thing about this book is that each chapter ends with a few recipes based on conversations and events in the chapter. Lerman has created a cookbook based on stories, which is, let's be honest, what healthy relationship with food looks like (if years of watching countless hours of the Food Network has taught me anything). She has recipes for everyone, from a classic borscht to a No Bake Pecan Pie and Healing Mushroom Miso Soup.


I chose to focus on Peanut Butter Love—the Best Flourless Blondie recipe from a chapter where Lerman talks about her relationship with her sister and how she used to bring or send treats to her sister, who was traveling and acting in "Annie" (because their mom wasn't focused on food/treats). Lerman made blondies and other sweet treats for her sister, and that was one of the ways that the two of them were able to bond across the miles between them. Here's the recipe (and they really are to die for):

Ingredients
  • 16 ounces natural, no sugar added peanut butter
  • ½ cup pure maple syrup
  • ½ cup original soy milk or nondairy milk of choice ( I use ones that have about 7 grams of sugar per serving)
  • 1 ripe banana, mushed
  • 2 eggs, beaten
  • 1 teaspoon vanilla
  • ½ teaspoon salt
  • 1 teaspoon baking soda
  • ¾ cup dark, semisweet chocolate chips
  • Butter or oil for greasing the pan
Directions
Preheat oven to 325 degrees. In a bowl, mix the peanut butter, maple syrup, milk, and mushed banana. Mush it all up and combine well. Then mix in the beaten eggs, vanilla, salt, and baking soda. Mix together until well blended and smooth. Stir in half the chocolate chips. Pour the batter into a well-greased 8-inch-square Pyrex dish. Scatter the remaining chips on top.

Bake for 55 minutes, checking after 15 minutes to make sure the edges do not get too brown. If the top looks very brown, cover with foil and bake for the remaining 40 minutes. Cool and serve.

Note: Mine got a little too brown because I got distracted with the baby ... I recommend cooking for 15 minutes and covering with foil for blondies that aren't so brown. 


GIVEAWAY! Comment on this post and let me know what your relationship with food was like growing up. I'll pick one winner at random on July 19, 2016, to receive a copy of this book. 

Rules: Open to U.S. residents only. Must comment to be entered. 

Sunday, February 8, 2015

The Best Gluten-Free Challah Recipe You'll Find

Best-Ever Gluten-Free HaMotzi Challah Recipe

Nearly two years ago I posted up a few of the recipes I was relying on for making gluten-free hamotzi challah (meaning bread that I could wash and say a blessing on for Shabbat). I don't make or eat this bread during the week, because it'd be too expensive and time consuming, but for Shabbat it's important to have bread you can make a bracha (blessing) on. I've gone through a dozen different recipes, flour mixes, even trying Bob's Red Mill's new 1-for-1 gluten-free mix, all with terrible luck.

The facts:
  • For challah (or matzah for that matter) to be hamotzi, it needs to include at least 51 percent of one of the following grains: barley, wheat, oats, spelt, or rye. (See this Chabad.org article for their take on oat matzah.)
  • Gluten-free oats are those that are grown in dedicated fields and produced in dedicated facilities. (Traditionally, oats are grown in fields surrounded by wheat, creating cross contamination.)
  • Many people can't eat even gluten-free oats, despite the fact that it has been proven time and time again that the gluten in oats is not like that of barley, wheat, spelt (a type of wheat), and rye. 
  • Spelt is not gluten free. It is in the wheat family.
  • Gluten-free challah is, in my experience, unbraidable because the consistency of the dough is akin to cake batter, not traditional bread dough. For this reason, I recommend getting a mold you love, like the Kosher Cook's "challet" silicone pan, which is what I used for this recipe. 
And now, with our further ado, the recipe that I have been perfecting in my kitchen, that Asher prefers to regular challah and that was recently a hit at a friend's conference.

I've separated the recipe out in a way that makes sense to me. I like to see everything in parts -- ingredients (wet and dry), mixing, rising, and baking. It just makes more sense to me because then I can plan out how long things will take and what kind of attention I need. Ultimately, this recipe is very low fuss.

The Only Gluten-free Challah Recipe You'll Ever Need
Makes 4 challets

Ingredients: Get everything measured and mixed beforehand, lest your yeast/sugar mixture go crazy. 

For the Rise
  • 2¼ tsp dry yeast or 1 envelope
  • 1 tsp sugar
  • 1/4 cup warm water
Dry Ingredients
  • 2 1/4 cups GF oat flour (I grind my own)
  • ½ cup GF rice flour
  • ¼ cup GF potato starch
  • ¼ cup GF tapioca flour
  • 1½ tsp salt
  • 2 tsp xanthan gum
Wet Ingredients
  • 1/4 cup honey
  • ¼ cup canola oil
  • ½ cup almond milk
  • ½ cup warm water
  • 2 large eggs
For Baking
  • 1 egg yolk
Mixing (10 minutes)
  1. Preheat the oven to 200°F.
  2. Dissolve the teaspoon of sugar in the ¼ cup warm water. Add the yeast, mix well with a fork for about 15 seconds, and set aside until frothy, about 5 minutes.
  3. Measure and combine the dry ingredients in one bowl, getting rid of clumps. 
  4. Combine the honey, oil, milk, eggs, and warm water. 
  5. Pour the wet mixture into the dry mixture slowly and mix to combine. 
  6. Add the yeast mixture from the first step. 
  7. Mix well for 3-5 minutes (I do it all by hand, folks, but feel free to use your mixer). The mixture will be a little runny, but shouldn't be too runny. UPDATE: I found that using my KitchenAid and having it run with the whisk attachment for about five minutes got a lot of air in the dough, which made it rise better and it turned out to be much lighter and tastier as a result. 
  8. Turn the oven off. 
Rising (~ 2 hours)
  1. First Rise: Cover the dough bowl with parchment paper and leave in the warm (but off!) oven for about 1 hour or until the dough has doubled in size.
  2. Take the bowl out and turn the oven back on to preheat to 200°F.
  3. Stir the dough down and spoon into your lightly greased pans -- small loaf pans work, but I use the challet pan, and this recipe makes 4 challets.
  4. Turn the oven off.
  5. Second Rise: Cover the pan(s), return back to the warm (but off) oven, and let rise again for another 40 minutes or so, until the dough has doubled.
  6. Remove the rising challah from the oven. 
Baking (~ 30-35 minutes)
  1. Preheat oven to 375°F. 
  2. Part One: Bake uncovered at 375°F for 15 minutes.
  3. Line a cookie sheet with the parchment paper you used to cover the dough. 
  4. Remove pans from oven and invert half-baked loaves onto the cookie sheet. They should be solid at this point. 
  5. Lightly glaze loaves with the egg yolk, then return to oven.
  6. Part Two: Bake uncovered at 375°F for 15-20 minutes. You'll want the tops to have a nice, golden brown coloring. 
  7. Move to wire rack to cool.
Enjoy! Let me know if you have any trouble with this recipe. I edited it a million times to get it here. 

Tuesday, March 19, 2013

Gluten-Free Challah: Take One

UPDATE: I've been working hard at this, and I finally have the Best-Ever Gluten-Free Challah Recipe -- it's the only one you'll ever need. 


NOTE: I've started using a NEW recipe that I'm pretty fond of, although this one still holds a place close to my heart. Check out this other gluten-free challah recipe from MyJewishLearning.com. 


I've had a lot of requests for my recipe for gluten-free challah, so it's about time I got down to it. Now, I have to start this off by saying that if you are full-blown celiac, there's a chance that you can't handle oats -- even those of the gluten-free variety. I'm blessed in that gluten-free oats and I get along just dandy, so for Passover and on Shabbat and holidays, I partake of the gluten-free oat variety of bread products. If you can't, then my suggestion is to just buy something packaged in the store because gluten-free baking can be expensive. I like being able to make motzei, so for Shabbat I put together this Gluten-Free Honey-Oat Challah.

Wait, something else I need to mention: My challah isn't braided. Most gluten-free challah isn't braided. Why? Because the dough just isn't the right consistency for braiding, unfortunately.

That being said, does challah have to be braided to be challah?

I can't seem to find anything that says that the braiding is a necessity of challah. The reason we have two loaves of challah for Shabbat are clutch in commemorating the double portion of manna that HaShem provided the Israelites in the desert (Exodus 16:4-30). The various shapes and stylings of challot have a varied history.

Evidently, according to author Gil Marks, most Ashkenazim used their weekday round or rectangular loaves for Shabbat, but German Jews began to create ova, braided loaves modeled on a "popular Teutonic bread." (Whatever that means.) This shape became the norm, although many Middle Eastern and Sephardic Jews still use a round, flat bread or plain rectangular loaves for their Shabbat challot.

So we'll say that my delicious little Honey-Oat Loaves fall in line with the Sephardic custom, and yours can, too! Just pop over to Barefeet in the Kitchen for the recipe. I'd like to think I came up with it on my own, but credit goes where credit is due. The only thing I did different was bake the loaf in three small loaf pans, but I can tell you this loaf is good enough for even the most discerning gluten-loving foodie (Mr. T was quite fond of it!).